Abstracts
First of all, we want to make it clear that we do not recommend opening and charging the IGET Bar vape. However, to satisfy your curiosity, so we took the time to make a tutorial on how to charge the IGET Bar with a list of five simple steps. Here’s what you need to do:
- Start by gathering your tools
- Create a DIY charging cable (Samsung, iPhone, Android charger are available to use)
- Open the IGET Vape Bar
- Determining the positive and negative terminals of a battery and charging it correctly
- Assembling the IGET Vape Bar
Remember, safety comes first. Make sure you know all the safety guidelines and precautions before attempting these steps.
Introduction
This guide is only meant to satisfy the curiosity of vapers. Charging is not recommended, after all, this is a disposable e-cigarette. We are simply telling you “How the IGET Bar 3500 Charging Works” and providing a brief step-by-step guide to charging the IGET Bar.
Note: This article is for reference only. Charging an IGET disposable vape poses a safety risk. Please charge at your own risk.
List Of Tools
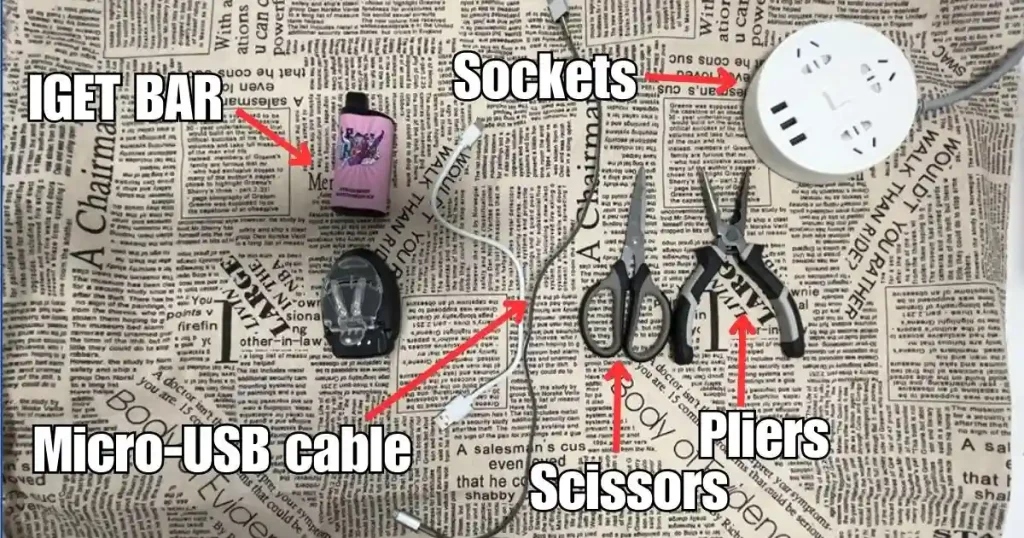
- An IGET Bar
- A micro-USB cable
- A pair of scissors
- A pair of pliers
- Sockets with short-circuit protection
Using a Samsung, iPhone, or Android charger is also available, but you have to distinguish between the positive and negative terminals of the DIY cable.
Before you are going to charge your IGET Bar, make sure you have a short circuit protected outlet if you don’t want to get electrocuted. This is because any short circuit in the DIY charging cable can cause a serious shock hazard.
How To Recharge IGET Bar Properly?
This video, meticulously crafted by the team at IGET Vape, guides you on how to charge it.
Remember, safety comes first, and it is best to wear insulated gloves, this tutorial is for reference only.
Total time: 30 minutes
Start by gathering your tools

You’ll ideally need an outlet with short-circuit protection to avoid potential electric shocks.
You’ll be modifying the micro-USB cable with scissors to create a DIY charging cable, and the pliers will be essential for carefully opening the IGET Bar disposable vape. Always handle these tools with caution, as improper use can result in injury.
Create a DIY charging cable
When you cut the charging cable, you will see four cables: red (positive, for charging), blue (negative), green and white (for data, not for charging). Typically, red usually indicates the positive terminal and black indicates the negative terminal. The safest practice is to use a multimeter!
WARNING: You should have the knowledge to safely identify and connect wires before proceeding. Improper handling may result in electric shock or fire.
Open the Bar Vape
Grip the IGET Bar vape securely, using pliers at the base for gentle rocking motions to detach the battery and system without harming the internals. Avoid excessive force to prevent snapping battery wires. Carefully remove and later reassemble all parts.
Disassembling reveals the vape’s heating system, including the E-liquid tank, battery, connecting wires, heating coil, and rubber seals. Successful disassembly means seeing these components laid out.
Important: Proceed with caution to prevent e-liquid spills and wire damage. Note, disassembling voids any return or exchange options, with any damage being your responsibility.
Of course, you can click to learn more about How To open IGET Bar.
Determining the positive and negative terminals of a battery and charging it correctly
When you charge the IGET Bar’s battery, you’ll need to find the two wires that connect: the red wire (positive) and the blue wire (negative).
Then connect the red wire from the DIY charger to the red wire from the battery and the blue wire from the charger to the blue wire from the battery.
When charging your IGET vape, it is recommended that the charging time should not exceed 2 minutes. For safety reasons, 2-3 charges of 1-2 minutes each are usually sufficient.
You need to keep an eye on your device at all times, if the battery gets hot or smokes, stop charging immediately. At this point your device is already potentially at risk, it would be wise not to reassemble it and use it, but to buy a new one.
Assembling the Vape
When reassembling your IGET Bars, first make sure that the e-liquid is not leaking and the battery is not overheating. The next key is to reassemble the device carefully.
Place the battery and heating system back into the Bar vape’s housing, being careful not to pinch any wires. Carefully reattach the bottom cover, holding it securely in place.
Try out the device. If the device starts and the flavour and vapor production improves, you have successfully charged the IGET Bar. If the device does not start or performs poorly, the charging may have been unsuccessful.
Charging a disposable vape like the IGET is risky. We still recommend that you buy IGET Vape for safety and to get the best experience.
Related Post: How To Refill IGET Bar
Estimated Cost: 30 AU
Tools:
- An IGET Bar
- A micro-USB cable
- A pair of scissors
- A pair of pliers
- Sockets with short-circuit protection
Materials: An IGET Bar vape
IGET Bar Battery Life & Specifications
The IGET Bar comes with a 1500mAh lithium battery, designed to be disposable. This battery capacity offers 3500 puffs, granting users an extended usage period.
However, the concept of recharging comes into play, given the device’s long lifespan. This is discouraged due to safety concerns.
More Safety Precautions
When thinking of how to recharge IGET Bar, remember these safety tips:
- Avoid High Temperatures & Humidity: Overheating and moisture can cause dangerous malfunctions.
- Limit Static Electricity: Work in a static-free environment to prevent shocks.
- Never Leave Unattended: If the IGET Bar starts overheating or smoking, you need to react immediately.
- Check for Leaks: Ensure there’s no E-liquid leakage before charging.
- Respect Charging Times: Overcharging could cause the battery to fail, leading to possible combustion.
Despite these precautions, remember that recharging an IGET Bar is inherently risky and not recommended.
Verdict
This guide has given you an inside look into how to recharge IGET Bar – a process that is both complicated and risky. We shared this information for educational purposes and to satisfy your curiosity, not as a recommendation for a DIY project.
Recharging a disposable vape like the IGET Bar requires a number of tools, a solid understanding of electronics, and a high degree of care to avoid potential hazards not to mention the fact that tampering with the device voids any warranty and could result in an unflappable product.
Related Posts
- IGET Bar Plus Charging Instructions: 5 Effective Guides
- How To Recharge IGET Legend? 5 Easy Steps To Make It
- How To Get IGET Bars To Work Again?
- How To Recharge IGET Moon: 6 Steps To Quickly Get It Done
FAQ About Charging IGET Bar
Is an IGET Bar rechargeable?
The IGET Bar 3500 vape is not rechargeable, it is a disposable vape, just use it and replace it with a new one.
How many times can you recharge an IGET Bar?
As a disposable vape, the IGET Bar is not rechargeable and if you must perform the act of recharging, you can charge it at most once.
How do you open the bottom of an IGET Bar?
Grasp the base of the IGET Bar with a pair of pliers, gently wiggling it from side to side, then carefully extract the bottom cap.


